
When you conjure up a vision of a stunning piece of jewellery, you probably think of gleaming gemstones and precious metals. Though these materials are undeniably impactful in the crafting of jewellery, another less-conspicuous material plays a pivotal role in many creations: Wax. Specifically for our purposes, wax carving.
Wax carving is a fundamental technique in the realm of jewellery making, with its roots tracing back to ancient civilisations. Despite this, it remains an age-old method that continues to shape modern jewellery designs and this is your practical guide to follow:
What is Wax Carving?
Wax carving is essentially the process of sculpting a piece of jewellery in wax, which is then used to create a mould. Molten metal is poured into this mould, resulting in a beautifully intricate metal replica of the wax original.
The technique is often likened to other forms of sculpting, but what sets it apart is the combination of creativity, precision, and the finishing of the cast that results in a wearable art form.
Selecting Your Wax For Carving
Different colours of wax typically indicate its hardness and flexibility. For instance, blue wax and green wax is recommended for beginners due to their hardness and lower flexibility which will minimise errors.
Wax sheets of different thicknesses (2-6mm) and lengths are ideal for 2D designs. Thin sheets are ideal for raised designs and can be accurately cut to be added to earring, broach and pendant designs. They can be used to create curved designs or form sheets for setting gemstones in jewellery. They can be cut with scissors or a jeweller's saw and then carved or filed as needed.
Wax blocks are of bigger size and allow for easy drilling, carving, milling, sawing and even lathing and CNC routing.
Wax tubes and other extruded profiles are available to allow for full 3D designs.
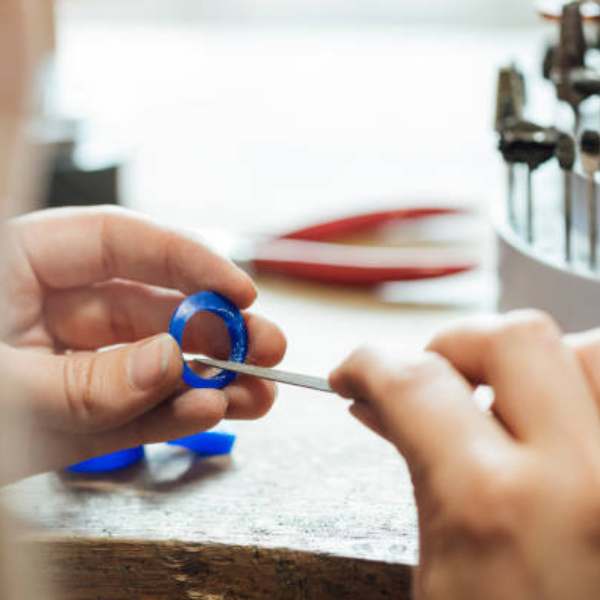
Wax tubes are ideal for ring designs but can also be incorporated for the creation of pendants and medallions.
Wax wires come in assorted shapes and sizes and assist with adding decorative effects to your design. They are ideal to raise the height of your design and for creating settings for other elements to be added after the casting process. Creating the clasps on a belt buckle is a common example of using wax wires in a design.
Tools for Wax Carving
Wax carving tools play an essential role in the process of creating intricate jewellery pieces. These tools come in various shapes and sizes, each designed to serve specific functions in the process.
Here is a detailed list of essential, yet basic wax carving tools and their uses:
1. Wax Carvers
These tools come in a variety of shapes and sizes, typically featuring a sharpened point or edge on one or both ends. Wax carvers are used for removing large amounts of wax, initial shaping, and smooth surfaces.
A wax carver set is a good investment as it allows infinite possibilities and cuts down on carving time. A carver set will generally include multiple-edged carvers ranging from pointed, angled, free-forming, spoon-ended, scoop-ended, scrape ended and scalpel-ended carvers.
• Spatula Carver: This tool has a flat, rounded edge that is excellent for smoothing out wax surfaces and working on curved shapes.
• Sgraffito Carver: With a needle-like point, this type of carver is perfect for precise and intricate detail work.
2. Files
Wax files are similar to standard metal files but are designed explicitly for use with wax. They help in refining the wax piece's shape and smoothing out rough surfaces.
- Half-Round File: This file has one flat side and one curved side, which makes it versatile for working on both flat and curved surfaces
- Needle Files: These files are slender and narrow, making them perfect for refining smaller details or hard-to-reach areas.
3. Wax Burs
Wax carving burs (or Burrs) are a useful tool and crucial in the creation of wax-based jewellery designs. These tools are typically attached to a rotary tool such as a Dremel, or a micromotor and used for carving, shaping, and adding intricate carvings to a wax model.
Burrs suitable for wax have lots of space in between the cutting flutes to prevent clogging so you need to look for burrs that are described as single cut.
Typically these carving burrs are made from steel, however, for a more premium, long-lasting alternative with higher cutting performance and precision, solid tungsten carbide burrs should be used.
Here is a detailed list of various types of wax carving burs:
- Cylinder Burrs: These are ideal for cutting straight lines, flattening surfaces of the wax, and carving out channels.
- Ball Burrs: These burs have a rounded tip, which can be used to create curved or rounded designs and for adding fine details.
- Inverted cone burrs: These cutters are cone-shaped but have the tip of the cone facing upwards. They are suitable for making precise angled cuts in wax and are often used to carve out undercuts or to reach tight or intricate areas
- Cone Burrs: Cone burs have a pointed, cone-like shape and are great for defining and deepening details. They're also useful for making holes or creating channels in a wax model. Also, you can use them to remove large amounts of material quickly.
- Hart Burrs (bearing cutter burrs): These burs are named for their peculiar heart shape. They are invaluable for stone-setting applications and can be used for creating prongs or seat cuttings.
- Bud Burrs: These burs resemble the shape of a bud or flame. They are typically used for intricate carving and engraving work. They can be used for creating details, smoothing, or refining the curves on wax models.
- Wheel Burrs: Wheel burs feature a flat disc shape. They're used for straight-line carving and creating linear grooves in wax pieces.
- Taper Burrs: Taper burs are similar to cone burs but have a more extended and slender shape. They are used for intricate designs and are excellent for reaching narrow and deep spaces in a design.
4. Wax Pen (heat carving pen)
This tool is used to add or manipulate wax during the carving process easily. It allows you to apply small amounts of molten wax to your design or make minor adjustments to your piece.
5. Jeweller's Saw and Saw Blades
A jeweller's saw is a thin, lightweight saw used to cut through wax or metal. It's essential for cutting wax pieces to size before starting the carving process.
Special wax saw blades are recommended as they are designed not to clog up when cutting through the wax. The saw blades can cut through large blocks, wax tubes. shape, cut out internal sections, trim and saw off sprues.
6. Penknife or Scalpel blade
You can use a penknife or scalpel to carve the wax. Both can be used for cutting wax sheets or blocks into smaller pieces or specific shapes before the carving begins.
They are excellent for adding intricate details and fine lines to your wax model and as you carve there might be small amounts of excess wax that need to be removed or trimmed.
If you've created a wax model with a sprue system during the casting process, you'll need to remove these sprues after casting. A scalpel blade is an excellent tool for this task, as it can slice through the connection points with precision, minimising the risk of damaging the underlying metal.
7. Sandpaper
Sandpaper with varying grits is used in the wax carving process to smooth out rough surfaces and refine the piece's texture. Sanding pads in varying grades can also be a great addition to your tool box. Start with coarser grits like 100# and work your way to finer grits like 800# for an excellent, smooth finish.
8. Wax Ring Sizer
This tool, which resembles a tapered mandrel, is used to measure and shape the wax ring tubes to the correct size before starting the carving process.
9. Alcohol Lamp/Wax Heater
An alcohol lamp or a wax heater provides a controlled heat source that can be used to soften the wax, making it easier to carve, or to slightly melt the wax for joining two pieces or fixing small imperfections.
10. Permanent Marker
The primary role of a permanent marker in wax carving is to trace your design on the wax block before you begin to carve. The bright and bold lines of a permanent marker ensure that the design stands out on the wax surface and won't rub off or fade during the carving process.
By having a variety of wax carving tools at your disposal, you'll be better equipped to tackle a wider range of designs and challenges when creating jewellery. Each tool serves an essential purpose in the process, so experiment and practice with these instruments to develop your skills and create remarkable pieces of wearable art.
Step 1: Transfer Your Design To Wax
Your design could be a sketch that outlines different angles and aspects of your future piece, or it could just be a detailed picture in your mind. Whatever the case, having a clear idea of your final piece is instrumental in achieving satisfying results in wax carving so exhaust your enormous creativity and get designing!
Next, you will have to transfer your design onto the carving wax. In a 2D design, the design will simply be drawn or traced onto the wax sheet. You can use a nail or push pin to punch out the outline of your design or start carving free-hand – there are no rules here.
Step 2: Select and Cut Your Wax
Once your design is ready, the next step is selecting a suitable piece of wax for the type of jewellery you're making and cutting an initial piece from the block.
Choose your wax based on the finished piece, so if you're designing a ring, start off with a wax tube rather than wax blocks or wax sheets. This piece should be slightly larger than your design to accommodate any alterations or mistakes.
When it comes to cutting the wax, remember that precision in this step will result in less waste and a smoother carving process.
Step 3: Sculpting Your Piece
Now comes the fun and challenging part - the sculpting. Using your carving tools, start by outlining your design on your wax piece. Work gradually, making small cuts to slowly eliminate the unwanted wax.
It may be tempting to rush this process, but carving requires patience and steady hands to correctly execute the design and prevent errors that may be irreversible.
Step 4: Refining Your Piece
After you've achieved a rough shape of your design, it's time to refine it further and create different forms and complex designs. Needle files and sandpaper can be used to smooth adorning and edges. Start with coarse grit sandpaper such as 100# and gradually move on to finer grits such as 800# until you're left with a perfectly smooth surface.
Step 5: Casting Your Piece
The next step is casting. This lost wax casting process essentially involves the creation of a mould from your finished wax model. The wax is then completely melted away, leaving only the mould behind.
Molten metal, often gold or silver, is then poured into the mould, filling the emptied space once occupied by the wax. The metal is allowed to cool and harden, culminating in a solid piece of jewellery that is an exact replica of the original wax model.
Step 6: Polishing and Finishing Touches
The final step in the process comprises polishing to bring out the shine and surface detail of your new metal piece. This is usually done using specialised rotary tool polishers and compounds. If gemstones or other ornamentations are part of your design, this is the time to set them into your jewellery piece.
Wax Carving: A Worthwhile Skill
Given the scope of its role, learning the craft of wax carving is worthwhile for novices and experienced jewellers alike. It opens an avenue of possibilities for creating intricate, one-of-a-kind pieces that tell distinct stories through their craft.
Although potentially challenging for beginners, the result of a beautifully finished piece makes all the effort worthwhile.
Moreover, as a form of artistic expression, wax carving invites you to immerse yourself in the process, appreciating every detail and understanding the craftsmanship that goes into creating stunning pieces of jewellery.
It is indeed a journey of exploration, learning, and ultimate satisfaction when you see your designs materialise into tangible, wearable art.
To summarise, wax carving in jewellery making is a fundamental skill that amalgamates creativity with precision and technical mastery.
Embracing the “wax-to-metal” process can open up an exciting world of fine jewellery design and creation allowing even a novice to create intricate pieces that were once thought to rest only within the repertoire and advanced techniques of master wax-carvers.
In short, wax carving is not an art form to be intimidating or difficult. With determination, passion, practice, and careful attention to detail, anyone can create beautiful pieces of jewellery, making the process as rewarding as the final product.
Seek out some online classes for invaluable advice or just have a play with some excess wax, you only need a few basic tools and a small space, so what's stopping you?